GrillinFools

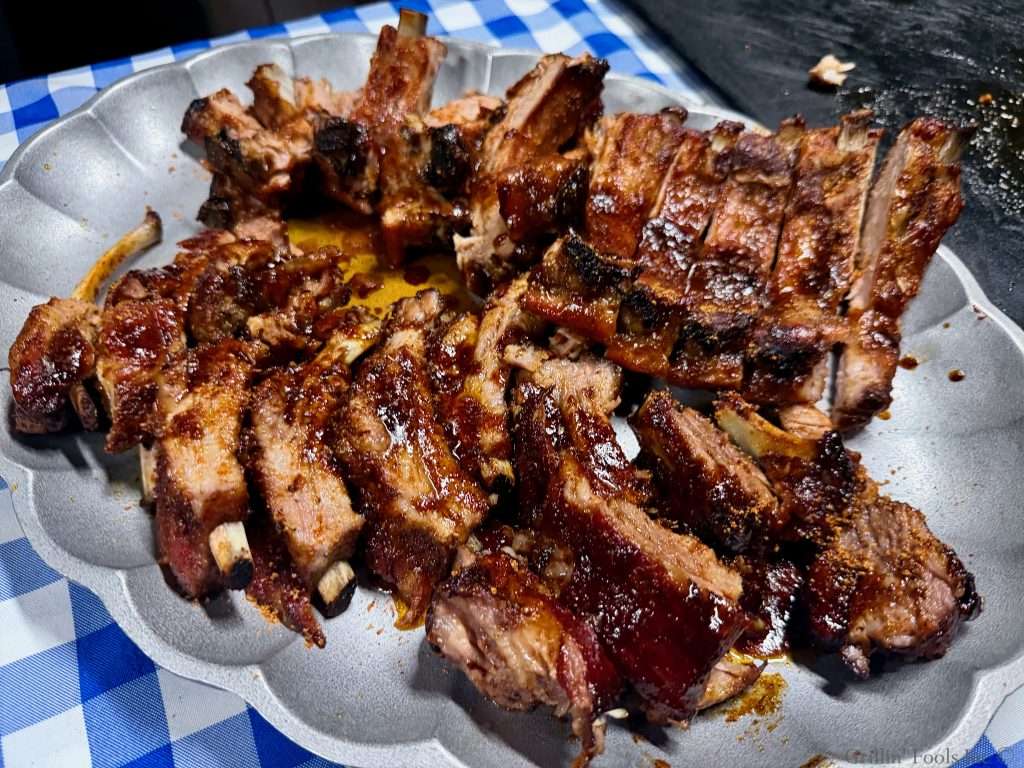
Baby back ribs, skinned, salted and seasoned with a BBQ rub, then smoked via two zone grilling on a charcoal grill with hickory wood. After about 3 hours in the smoke, the baby backs are placed in pink butcher paper with pats of butter, apple butter and more BBQ seasoning, wrapped up and placed back on the grill for about an hour. After an hour in the wrap, the ribs are removed from the grill, sliced and served with the apple butter slurry in the butcher paper poured over the top to complete Smoked Baby Back Ribs with Apple Butter.
A few years ago, I did Foil Boat Ribs with Pumpkin Butter. I really dig pumpkin flavored stuff, but I realize there is a growing population of society that is over it. I wanted to share this variation with apple butter instead as well as pink butcher paper rather than a foil boat for those folks that are sick of pumpkin spice whatever. If you are one of those that digs the pumpkin flavor profile, I also did ribs brined in pumpkin spice coffee. And I also did the perfect blend of these two flavor profiles with these apple pumpkin ribs.
Baby Back Ribs with Apple Butter Ingredients
- 2 slabs of baby back ribs
- Salt
- Your favorite BBQ rub, divided
- 6 pats of butter
- 16 heaping teaspoons of apple butter, divided
- Pink butcher paper

Prep the Baby Back Ribs
Skin the ribs of the membrane on the bone side:

Pro Tip ~ Take a sheet of paper towels and use it to grip the rib membrane. The membrane is very slippery. The paper towel will allow you to grip it and rip it.

The paper tower makes it much easier to get the membrane off with one tug whether spare ribs or baby back ribs:

Season the ribs with salt and your favorite BBQ rub:


Pro Tip ~ Always season the bone side of the ribs first. That way, when you flip the ribs over to season the other side, the natural concave of the bones keep the salt and seasoning up off the cutting board. If you season the meat side first and flip the ribs over to the bone side, all the seasoning that touches both the meat and the cutting board will stick to the cutting board and require re-seasoning. This applies to both baby back ribs and spares as well as beef ribs to a lesser extent.
Flip the ribs over and salt and season the meat side:


Prepare the Grill for Two Zone Grilling
Two zone grilling is simply setting up a hot side and a cool side. Smoke wood goes over the hot side and the meat goes on the other side. This allows the meat to cook low and slow, breaking down the connective tissue and rendering the fat, without overcooking or burning the meat.
This is the basic premise of what barbecue is. It evolved from poor people only being able to afford the tougher cuts of meat the rich folks left behind. The rich took the cuts from high up on the pig’s body that didn’t get much work and thus were naturally tender. This is where the term, “living high on the hog,” comes from. Poor folks were left with the tougher cuts from lower down on the pig. These were the muscles that had to work hard all the time and thus became tough. To make those tougher cuts tender and retain the juiciness, the meat has to be cooked low and slow to break down the connective tissue while not overcooking or burning the meat. This is how BBQ evolved.
In this session, I’m using my American Made Grills, Hybrid Ovation Grill where the right 12-14 inches has hot coals and a hickory split on the top just off the edge of the direct heat:

I want the wood close enough to the fire to smolder but not flat out burn.
The baby back ribs go on the other side of the hickory wood so they don’t get any direct heat and overcook before we break down that connective tissue:

Target temp inside the grill is 300F (+/-25):

Close the lid and the heat and smoke will do the rest.
After an hour, one slab of ribs was a little too close to the smoke wood and got a little charred:

A little char is not a deal breaker. A little char is actually pretty tasty. But too much char becomes burnt.
It looks like I caught it just in time.
Time to reconfigure the way my ribs are arrayed in the grill in relation to the heat.
I also refreshed the smoke wood with a couple new chunks:

After around 2 hours, my second round of smoke wood is about spent and I hit the ribs with a dusting of the BBQ seasoning:

After three hours, it’s time to wrap the ribs in pink butcher paper.
Start by tearing off a sheet of the butcher paper, laying down three pats of butter, four heaping teaspoons of apple butter and more of the BBQ seasoning:

Place a slab of smoked baby back ribs onto the butter, apple butter and seasoning, meat side down and then put four more heaping teaspoons of apple butter on top (using the back of the spoon so spread completely) along with a little more seasoning:


Wrap the ribs up tight in the pink butcher paper and place back on the grill.

Pro Tip ~ This recipe will work with all sorts of butters like pumpkin, peach, pear even honey butter. Also BBQ sauce works great as well.
Repeat with the other slab and close the lid for 1 hour:

After an hour, the ribs were super tender and still very juicy. Here’s one of the slabs:

Here’s a close up of some of the bones from these slabs of ribs:

And here is the other slab. How juicy are these:

Check out the video below to see exactly how juicy these ribs are.
To serve these ribs, slice the ribs into individual bones and transfer to a platter. Then pour over the apple butter slurry from the butcher paper over the ribs and dust with a little more BBQ rub:


Smoked Baby Back Ribs with Apple Butter Summary
These ribs are fantastic any time of the year, but really hit in the Fall. I love to take the kids apple picking and grab a couple pumpkins. And inevitably, the pumpkin patch has a little country store that has all sorts of fruit and pumpkin butters. So to me, it’s just an amazing fall recipe.
If you have any questions or comments, feel free to leave them below or send me an email.
Also, if you could leave us a great review with lots of stars ⭐️⭐️⭐️⭐️⭐️ that would be most appreciated!
Additionally, you can follow us on our GrillinFools Facebook, Instagram, Pinterest, Twitter/X and YouTube feeds
Recipe Card:

Smoked Baby Back Ribs with Apple Butter
Equipment
Ingredients
- 2 slabs Baby Back Ribs
- Salt
- BBQ Rub Divided
- 6 pats Butter
- 16 teaspoons Apple butter Substitute any other fruit butter, pumpkin butter, honey butter or BBQ sauce
Instructions
- Skin the membrane off the back of each slab of ribs and season the bone side with salt and your favorite BBQ rub. Then flip over and season the meat side with salt and BBQ rub
- Set up the grill for two zone grilling with hot coals and smoke wood on one side and no direct heat on the other side. Target temperature inside the grill is 300F (+/-25F). For this grill, the right two charcoal trays are filled with charcoal and char logs and lit. A hickory split goes just off the edge of the hot coals.
- Once the wood starts smoking and the temp inside the cook chamber is around 300F, place the seasoned ribs off the edge of the hot coals.
- Close the lid for about an hour and then replace the smoke wood as necessary. Also reposition the ribs so the farther slab is moved to be the closest and vice versa.
- After 2 hours, move the ribs if necessary and give the ribs a dusting of the seasoning. Replace the smoke wood with fresh wood if necessary.
- After about 3 hours, prepare the pink butcher paper by tearing off a long sheet and slapping down three pats of butter, four heaping teaspoons of apple butter and a couple hearty pinches of seasoning. Set a slab of baby back ribs, meat side down on the apple butter, butter and seasoning and then place four more teaspoons of apple butter on the bone side of the ribs, using the back of the spoon to spread the apple butter evenly. Dust the bone side of the ribs with more seasoning.
- Repeat this process with the other slab of ribs and place both wrapped slabs back on the grill, on the indirect side for an hour.
- Remove the wrapped ribs from the grill and the butcher paper. Carve the ribs into individual bones and transfer to a platter. Drizzle the apple butter slurry from the butcher paper over the top of the carved ribs and dust with more BBQ rub for garnish and a little extra blast of flavor.
- Serve and enjoy.
Video


Related Posts